

Chapel of Madness Dungeon Guide
Best Chapel of Madness Dungeon Guide for Throne and Liberty! This guide will show you how to defeat the Dungeon’s Bosses and complete it successfully.
What is Chapel of Madness in Throne and Liberty?
Chapel of Madness is a Level 55 Dungeon, that offers great rewards to players. A unique Dungeon with interesting encounters and strong Bosses in Throne and Liberty. To access it you need a minimum Combat Power of 3500.
Chapel of Madness Dungeon Bosses
There are three Bosses inside the Dungeon. Greyeye is the final Boss of the dungeon that offers a challenging fight with interesting mechanics. Before you can fight Greyeye you will have to defeat the Summoning Ritual Chief Priest and the Sacrificed Cultist Spirit.
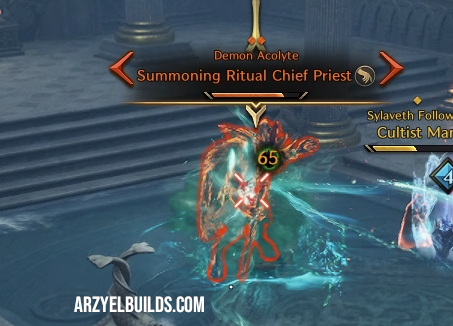
How to Defeat Summoning Ritual Chief Priest Boss
The Summoning Ritual Chief Priest is the first Boss of the Dungeon, that offers a tricky fight! These are his main moves:
- Normal attacks to whoever has aggro.
- Summons a shield around him and channels an attack. The attack deals damage and stuns players. After a moment unleashes a lightning to them. The Lightning attack can happen independently.
- Picks random players and transform them into spirits. While in this form players cannot use their abilities.
After you defeat the Boss, proceed inside the dungeon. Kill every enemy you find and destroy their Ritual Totems. This will open the door to the Sacrificed Cultist Spirit area.
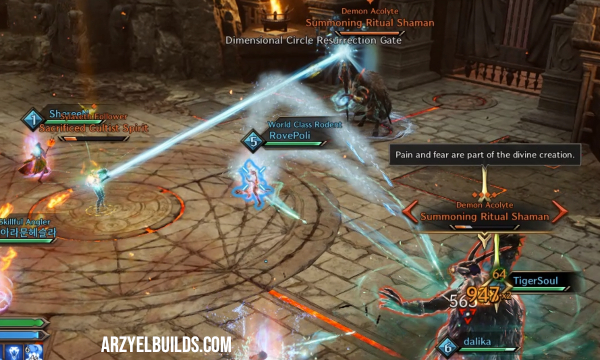
How to Defeat Sacrificed Cultist Spirit Boss
The Sacrificed Cultist Spirit does not fight back! It stands in the middle of the room with three Summoning Ritual Shamans around it. The Shamans provide a Shield to the Spirit that negates every damage. To hurt the Spirit you need first to kill the Shamans. The Shamans re spawn after some time, so you will have to be fast or repeat the process. When you defeat the Spirit you can enter the area of the Final Boss.
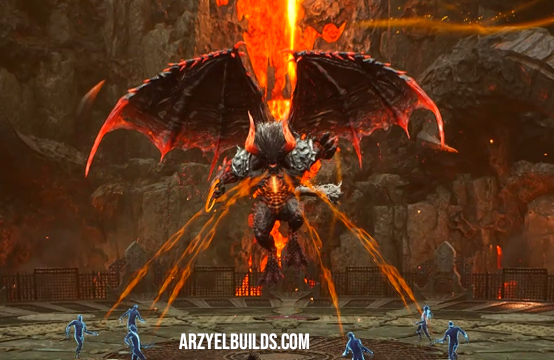
How to Defeat Greyeye Chapel of Madness Dungeon Boss in Throne and Liberty
Greyeye is the final Boss of the Dungeon, that offers a few unique and fun mechanics. This can be a challenging fight. Greyeye’s main attack moves are:
- Normal attacks against whoever has aggro.
- Fury Attack(you can block it) against whoever has aggro, that covers half of the area. Do not stand behind the Tank!
- Wrath Attack that you can dodge(Block does not work against this attack).
- Fire attack in a line in front of him, toward the direction of player with aggro! The Tank should face the Boss away from the rest of your team to avoid unnecessary damage.
- AOE attacks in a row. The Boss will jump on the air and unleash three attacks in a row. Each attack targets different rings of the area. Move inside the ring that is not highlighted to avoid damage.
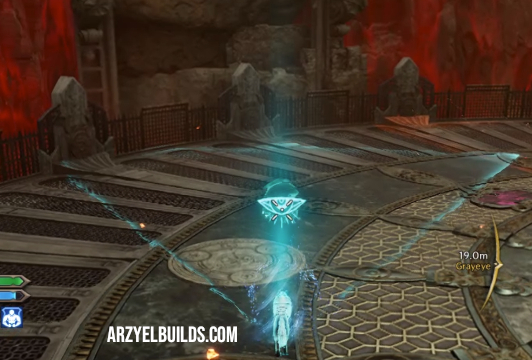
- Vision. The Boss will grant special vision to a couple players. These players will have an eye above their heads. If you get the eye move around the area and try to locate the hidden Sacred Spirits with your vision. When you find the Spirits, kill them fast. They leave behind a blue circle on the ground.
- Blue Circle! After the Vision, Greyeye will charge a massive AOE that will kill your party. Get inside the Blue Circle to survive.
I hope you enjoyed my Chapel of Madness Dungeon Guide for Throne and Liberty! For the Best Builds you can use to clear this Dungeon and prepare for the rest, you can take a look at my Throne and Liberty Builds!

Arzyel is a passionate Gamer and huge fan of the Elder Scrolls Series! A professional Content Creator and owner of the arzyelbuilds.com website that is focusing on The Elder Scrolls Online with the Best ESO Builds and Guides, as well as Throne and Liberty content with several TL Builds and Guides! Arzyel also publishes videos on his YouTube channel!
Thanks to his experience in Gaming and especially Online Gaming, Arzyel can create practical and effective Builds & Guides for ESO, Throne and Liberty and other titles, that are perfect for both New and Veteran Players! For more info you can check his Linktree and his About Me page.