

ESO Bal Sunnar Dungeon
Welcome to my Bal Sunnar Dungeon Guide for ESO! This is one of the two 4-man Dungeons that were added to ESO with the Scribes of Fate DLC! The dungeon entrance is located in the zone of Stonefalls. Bal Sunnar adds new achievements, challenges and four Armor Sets to ESO. There are Three main bosses you can defeat in the dungeon and three secret areas that will reward you with Buffs! As you progress inside the Dungeon you will experience Bal Sunnar in different time periods. Every time period will include one main Boss and an interesting Secret! This Bal Sunnar Dungeon Guide will focus on the Boss fights, their attack patterns and where to find all secrets.
Armor Sets in Bal Sunnar Dungeon ESO
There are four Armor Sets you can get from enemies in the Dungeon, a Light, Medium, Heavy and a Monster Set. The armor Sets you can farm here are:
- Ritemaster’s Bond, Light Armor Set
- Nix-Hound’s Howl, Medium Armor Set
- Telvanni Enforcer, Heavy Armor Set
- Roksa the Warped, Monster Set(Final Boss, Veteran difficulty only)
Main Bosses in Bal Sunnar Dungeon ESO
You can find each Main Boss of the Dungeon at the end of each map! Defeating them is necessary to progress in the dungeon. If you wish to discover the secret areas inside Bal Sunnar, you should do it before defeating the main Boss of each map! All main Bosses have their own unique attack patterns and can summon adds to make your life miserable!
Kovan Giryon
Kovan Giryon is the first main Boss of the Dungeon! A challenging enemy with a few deadly mechanics that you can find at the end of the first map.

How to Defeat Kovan Giryon in Bal Sunnar Dungeon
Kovan Giryon is a mobile enemy that teleports around the area and can summon minions to deal damage to you and your group. His Charged Heavy Attack is deadly and deals massive damage. The Tank should hold aggro and block to survive. He can also charge ahead to hit you hard and summon a Poison AOE under players that deals constant damage. Avoid overlapping to survive this mechanic. Kovan will teleport around smashing the ground and leaving behind another Poison AOE, as well as a copy of himself. His copies will later also smash the ground or charge ahead causing a Poison AOE explosion.
At around 70% he will levitate(Immune to damage) and initiate his first Dark Phase. A Primitive Nix-Ox will appear with its own unique attacks(spewing poison AOEs, front conal attack) while Nix-Hounds also appear to assist it. Kill the Nix-Ox to end the phase. After this first phase Kovan can shoot beams that stay in the area while he charges around the room. At around 45% his second Dark phase will begin. This time your enemy is an Iron Atronach with strong Fire attacks. Flame Salamanders will also appear. Defeat the Atronach to end the Phase. At around 20% his third and final Dark phase will begin. Smaller enemies will appear now but the Boss itself will become active after a while as well. The phase will end when you defeat Kovan Giryon.

Kovan Giryon important mechanics:
- Summons Poison AOEs under players. Avoid overlapping!
- Creates copies of himself that explode after some time.
- Large Beams in the area.
- Dark Phase at 70%, 45%, 20%. Defeat mini bosses and Kovan to end them.
Roksa the Warped
Roksa the Warped is the second main Boss of the Dungeon that you can find inside the Excavation Site!


How to Defeat Roksa the Warped in Bal Sunnar Dungeon
Roksa is an overall easier enemy than Kovan but still has a few deadly mechanics! During the fight, Roksa summons Orbs around the area. These Orbs will drain players and if left unharmed will one shot them. Attack them to survive. Periodically the Boss will initiate its own Dark Phase. Stay inside the safe areas when that happens. At around 70% Roksa will leave the area and summon minions to fight you. When you defeat the minions, Roksa will fire a massive Beam to whoever had aggro on her! Block the beam and outheal it. At 40% it will repeat this phase. Other mechanics you should keep an eye on are Roksa’s Charged Heavy Attack, which the Tank should hold aggro and Block as well as the ability to spawn poison AOEs.

Roksa the Warped important mechanics:
- Summons Orbs that drain and can one shot players. Attack them!
- Dark Phase at 70%, 40%. Stay inside the safe areas.
- Massive Beams. Block and Outheal them.
Matriarch Lladi Telvanni
The third and final main Boss of the Dungeon, that you can find at the end of the third map, inside the Peryitic Ritual Chamber of the Daedric Temple.

How to Defeat Matriarch Lladi Telvanni in Bal Sunnar Dungeon
Although Matriarch Lladi Telvanni is the final Boss of the dungeon, she is also the most straightforward and easy one! Her attacks are Poison based and can fire a Poison projectile at enemies but also summon Poison AOEs that explode on the ground. She will also charge forward leaving more ground Poison AOEs behind. During the fight the Matriarch will create a massive AOE that moves around dealing Poison damage. Her conal poison attack aims the Tank but if it hits another player, then that player will also spew poison in front of them uncontrollably. This side effect can harm other players and create issues.
At around 70% and 35% the Matriarch will stand in the middle of the room and summon poison everywhere. While this happens she is immune to damage. Minions will also spawn and they are also immune. Activate the Shards of Time that will appear to stop minions from moving and kill them. In Hardmode the Matriarch will also summon Skeevers. Skeevers target a player from the group and apply a deadly debuff if they reach them. Immobilize and kill them fast!

Matriarch Lladi Telvanni important mechanics:
- Conal Poison Attack that affects DPS and Healer. Avoid it!
- Fills the room with Poison and Summons adds. Use the Shard of Time.
- Summons skeevers that apply deadly debuff. Immobilize and kill them.
All Secrets in Bal Sunnar Dungeon in ESO
In total there are three secrets inside the Dungeon, One Boss and two puzzles. You can find one secret on each of the three maps of the dungeon. Completing the puzzles and defeating the Secret Boss will reward you with special buffs. The Buffs you can earn are:
- Strength of the Ancestors. Increases Weapon and Spell Damage.
- Ancestral Vitality. Increases Magicka and Stamina Recovery.
- Ancestral Resolve. Increases Maximum Health and Reduces Damage Taken.
Getting all three Buffs will make it easier to complete the Dungeon.
Where to find the First Totem Puzzle in Bal Sunnar Dungeon
You can find the First Totem Puzzle inside the arena on the Southern part of the Dungeon’s first map.

Use the wheels in front of you to rotate the totem and match the symbols with the three smaller totems, as seen on the picture above. Once you solve the puzzle, the cell doors will open and you will receive the Strength of the Ancestors Buff.
Where to Find Urvel Drath in Bal Sunnar Dungeon
Urvel Drath is the second secret of Bal Sunnar and the only Secret Boss. You can also find him inside the arena but you will have to take a detour this time. Enter the Excavation Site on the second map and before you face Roksa the Warped, head to the Arena Tunnels.

Urvel is an easy Boss. He mostly summons Boulders and uses basic Light and Heavy Attacks. He can streak around the arena and summon Fire bombs that follow a player around. You can easily avoid them. If you heal Beexilko, he will charge Urvel and stun him. When you defeat Urvel you will receive the Ancestral Vitality Buff.
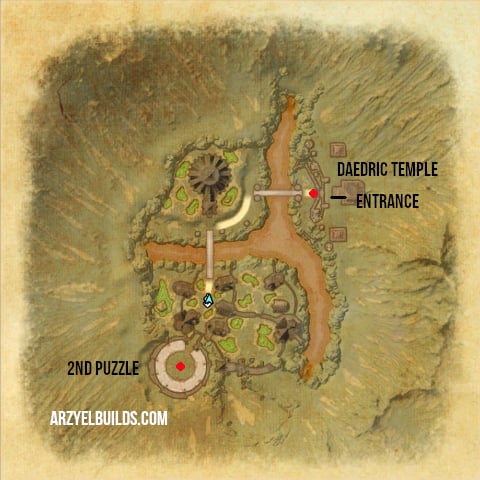
Where to find the Second Laser Puzzle in Bal Sunnar Dungeon
You can find the Second Laser Puzzle inside the same arena as well but on the third map this time.

Another easy Puzzle. All lasers should hit the totem in the middle of the room! Adjust the Obsidian Shards in the arena to reflect the lasers properly, so they can hit the totem. Once you solve this puzzle you will receive the Ancestral Resolve Buff!

Arzyel is a passionate Gamer and huge fan of the Elder Scrolls Series! A professional Content Creator and owner of the arzyelbuilds.com website that is focusing on The Elder Scrolls Online with the Best ESO Builds and Guides, as well as Throne and Liberty content with several TL Builds and Guides! Arzyel also publishes videos on his YouTube channel!
Thanks to his experience in Gaming and especially Online Gaming, Arzyel can create practical and effective Builds & Guides for ESO, Throne and Liberty and other titles, that are perfect for both New and Veteran Players! For more info you can check his Linktree and his About Me page.