

ESO Vampire Sorcerer DPS Build Subclassing
Welcome to my Magicka Vampire Sorcerer DPS Build for ESO! Baelnorn is a powerful Build that is utilizing the Vampire skill-line and Subclassing. The Build combines Sorcerer, Nightblade and Vampire abilities to help you complete Group Content but also easier Solo Gameplay! More Sorcerer Builds and Guides you can read:

Skills for Magicka Vampire Sorcerer – Nightblade Setup
This Subclassing Build is using the following Skill Lines:
- Daedric Summoning
- Storm Calling
- Assassination


- Arterial Burst(Eviscerate): Powerful spammable.
- Relentless Focus(Grim Focus): Turns into a deadly Spectral Arrow after five light/heavy attacks that also heals.
- Impale(Assassin’s Blade): Execute ability. Start using this skill once the enemy’s health drops below 25%.
- Summon Volatile Familiar(Summon Unstable Familiar): Strong Pet. Volatile Familiar can DPS and stun enemies with its special ability.
- Summon Twilight Tormentor(Summon Winged Twilight): When playing solo you can replace it with the Summon Twilight Matriarch(Summon Winged Twilight) morph for heals.
- Flawless Dawnbreaker(Dawnbreaker): Secondary Ultimate, good against multiple enemies.
- Unstable Wall of Elements(Wall of Elements): Great AOE damage skill.
- Barbed Trap(Trap Beast): Additional DOT damage that also boosts Critical Damage.
- Simmering Frenzy(Blood Frenzy): Great boost to Damage at the cost of Health.
- Incapacitating Strike(Death Stroke): Primary Ultimate.
Rotation
Set your Barbed Trap, activate Simmering Frenzy and attack with Unstable Wall of Elements, switch bars. Fire Spectral Arrow if it is ready(always fire it when it is ready). Activate Volatile Familiar and Twilight Tormentor(only when enemy is above 50% Health). Continue with Arterial Burst as your spammable and re cast the other skills when necessary. When the enemy is below 25%-30% start using Impale as your spammable. Use your Ultimate when ready and always Light Attack before every skill to boost damage.

Passive Skills for Magicka Sorcerer Vampire Build ESO
Passive skills are always important for every character and can help you maximize the potential of your Vampire Sorcerer Build. Try to unlock them as fast as possible, so you can become stronger and tackle harder content faster. These are the Passive Skills you should unlock for the Build.
- All Passive Skills from your Class’ Lines
- All Passive Skills from Weapon Lines you are using
- Passive Skills from Armor Lines you are using
- Passive Abilities from Guild lines(Fighters Guild, Mages Guild, Psijic Order) that affect your skills/Build
- Fighters Guild Passives: Intimidating Presence, Slayer, Banish the Wicked, Skilled Tracker
- Mages Guild Passives: Mage Adept, Everlasting Magic, Magicka Controller, Might of the Guild
- Vampire Passives: Feed, Dark Stalker, Strike from the Shadows, Undeath
- Undaunted Passives
- Your Racial Passives
- Medicinal Use Passive from Alchemy to boost the effectiveness of Potions
Vampire Sorcerer Subclassing DPS Build Setup
The Build is using a combination of strong DPS Sets to increase your damage and help you assist your group in PVE!
| Piece | Set | Type | Trait | Enchantment |
|---|---|---|---|---|
| Head | Slimecraw | Light | Divines | Max. Magicka |
| Shoulders | (Perfected)Whorl of the Depths | Light | Divines | Max. Magicka |
| Hands | (Perfected)Whorl of the Depths | Light | Divines | Max. Magicka |
| Legs | Harpooner’s Wading Kilt | Medium | Divines | Max.Magicka |
| Chest | (Perfected)Whorl of the Depths | Light | Divines | Max. Magicka |
| Waist | (Perfected)Whorl of the Depths | Light | Divines | Max. Magicka |
| Feet | (Perfected)Whorl of the Depths | Light | Divines | Max. Magicka |
| Necklace | Aegis Caller | Jewel | Bloodthirsty | Spell Damage |
| Ring | Aegis Caller | Jewel | Bloodthirsty | Spell Damage |
| Ring | Aegis Caller | Jewel | Bloodthirsty | Spell Damage |
| One Hand | Aegis Caller | Dagger | Charged | Flame |
| One Hand | Aegis Caller | Dagger | Charged | Poison |
| Staff | (Perfected)Crushing Wall | Lightning | Infused | Weapon Damage |
Armor Sets for Sorcerer Vampire DPS Build
These are the Best Armor Sets you can use with the Vampire Sorcerer Build for Solo or Group Gameplay and where you can find them.
- Slimecraw: Veteran Wayrest Sewers I, Maj Al-Ragath
- Whorl of the Depths: (Veteran)Dreadsail Reef Trial
- Aegis Caller: Unhallowed Grave Dungeon
- Harpooner’s Wading Kilt: Antiquities Reward
- Crushing Wall: (Veteran) Maelstrom Arena
- Order’s Wrath(for a No Trial Setup): High Isle, Crafted
Champion Points for Sorcerer Vampire Subclassing DPS Build
Below you will find the best Champion Points setup for the Build. When allocating Champion points to Slottable and Passive Stars your primary goal is to create paths! Allocate the minimum required points to stars along your path in order to reach your desired Slottable Stars faster. Once you have unlocked all Stars, start allocating more Champion Points to them to fill them out. Focus on Slottable Stars first, then Passive Stars. If you would like to learn more about Champion Points and how they work, you can read my ESO Champion Points Guide.
Warfare
- Slottable Stars: Deadly Aim, Master-at-Arms, Wrathful Strikes, Exploiter
- Passive: Eldritch Insight, Piercing, Flawless Ritual, War Mage, Precision, Quick Recovery, Hardy, Elemental Aegis, Preparation, Blessed, Tireless Discipline
Craft
- Slottable Stars: Steed’s Blessing, Master Gatherer, Gifted Rider, War Mount
- Passive: Gilded Fingers, Fortune’s Favor, Wanderer, Steadfast Enchantment, Treasure Hunter(slottable, required for path), Rationer, Liquid Efficiency
Fitness
- Slottable Stars: Celerity, Rejuvenation, Boundless Vitality, Fortified
- Passive: Sprinter, Hasty, Tireless Guardian, Hero’s Vigor, Mystic Tenacity, Tumbling, Defiance
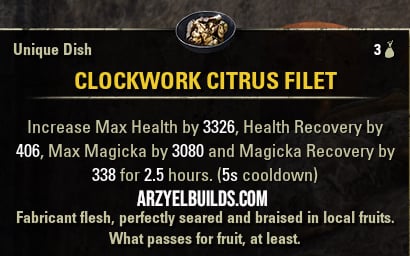
Food and Potions for Vampire Sorcerer DPS Build
Clockwork Citrus Filet is the Best Food for the Build while Essence of Spell Power is the best option as Potions.
Info for Magicka Sorcerer Vampire Subclassing DPS Build
Several important info for the Vampire Sorcerer DPS Build. What Mundus to use, the best race for the build and how to assign your attribute points.
Attribute Points
All points to Magicka.
Mundus Stone
The Thief to boost Critical Chance.
Race
The Best Race for the Vampire Sorcerer DPS Build in ESO is High Elf. Dark Elf, Khajiit and Breton are nice alternative Races you can use for a DPS focused Build. Any Race with Magicka bonuses can work well though. You can find more about the playable races in my ESO Race Guide!
Vampire or Werewolf
Vampire Stage 3 at least, for the Dark Stalker, Strike from the Shadows and Undeath Passives.
Companion for Vampire Sorcerer Subclassing DPS Build ESO
If you wish to play Solo with the Build, you can bring along a mighty Companion! Companions in ESO are helpful allies that can assist you in combat. Every Companion can fulfill every role in the game and help you enjoy ESO more by clearing content faster or by simply interacting with them and their charming personality! There are various Builds you can use for every available ESO Companion!
As a DPS focused character my recommendation is to bring along a Tank or Healer Companion! To find out which ESO Companion is the Best in every role you can take a look at my ESO Best Companion Guide! To further maximize the potential of your chosen Companion, you can wear the Telvanni Efficiency Set! A Crafted Set that reduces the cooldown of your Companions abilities, improving their damage and overall effects and assisting you further in combat.

Arzyel is a passionate Gamer and huge fan of the Elder Scrolls Series! A professional Content Creator and owner of the arzyelbuilds.com website that is focusing on The Elder Scrolls Online with the Best ESO Builds and Guides, as well as Throne and Liberty content with several TL Builds and Guides! Arzyel also publishes videos on his YouTube channel!
Thanks to his experience in Gaming and especially Online Gaming, Arzyel can create practical and effective Builds & Guides for ESO, Throne and Liberty and other titles, that are perfect for both New and Veteran Players! For more info you can check his Linktree and his About Me page.