

ESO Unhallowed Grave Dungeon
Welcome to my Unhallowed Grave Dungeon Guide for ESO! This is one of the two 4-man Dungeons, that were added with the Harrowstorm DLC! The dungeon entrance is located in the zone of Bangkorai. Unhallowed Grave adds new achievements, challenges and four new Armor Sets in ESO. In total there are Eight bosses you can defeat in the dungeon, Five main bosses and three secret, optional bosses. Defeating the three secret bosses, rewards you with buffs that will help you complete the dungeon objectives. This Unhallowed Grave Dungeon Guide will focus on the Boss fights, their attack patterns and where to find all secret, optional bosses.
Armor Sets in Unhallowed Grave Dungeon ESO
There are four Armor Sets you can get from enemies in the Dungeon, a Light, Medium, Heavy and a Monster Set. The armor Sets you can farm here are:
- Draugrkin’s Grip, Light Armor Set
- Aegis Caller, Medium Armor Set
- Grave Guardian, Heavy Armor Set
- Kjalnar’s Nightmare, Monster Set(Final Boss, Veteran difficulty only)
Main Bosses in Unhallowed Grave Dungeon ESO
You can find each main Boss by simply following the path inside the Dungeon. They are all relatively simple to defeat if you follow their mechanics. Some of their hardest mechanics only appear in Veteran Difficulty.
Hakgrym the Howler
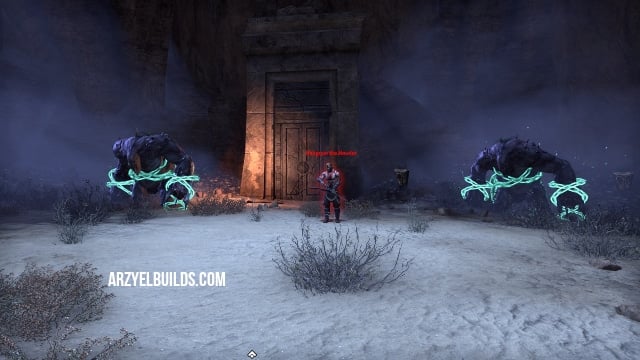
The first Boss of the Dungeon and in general an easy fight with two phases. You will have to fight Hagrym first as human and then as a Werewolf! He will also activate two Flesh Abominations to assist him during the fight!
How to Defeat Hakgrym the Howler in Unhallowed Grave Dungeon
His Light Attacks deal decent damage but the Tank should have no problem with them. His Heavy Attack can be devastating so the Tank will have to Block to avoid unnecessary damage. He can also summon skeletal werewolves to assist him. They are easy to kill with AOE skills.
Hakgrym will summon a crystal that explodes after a couple seconds but also a Woeful totem. Destroy the totem as soon as possible before it can start attacking your group. He can also slash players causing Bleed damage. When his health drops at 70% and 30% he will activate one of the two bound Flesh Abominations. Try to kill them fast since they have their own unique skills, including a big AOE stomp attack.
When you defeat Hakgrym he will transform into a Werewolf! In this phase be careful of his two slashes, heavy attack and block if he charges on you! While in this form he can summon skeletons, crystals like before and stomp the ground, releasing ground AOEs in different directions. If the Tank can hold aggro, this is an easy fight.
Keeper of the Kiln
A quite easy and straightforward fight as well. You will have to use the Grapple Bow during the fight though!
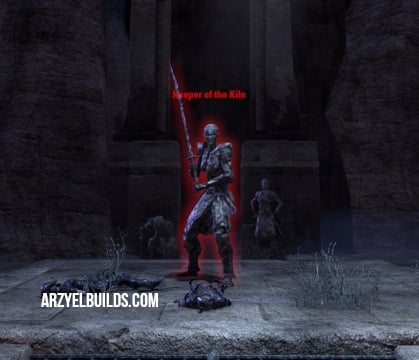
How to Defeat Keeper of the Kiln in Unhallowed Grave Dungeon
This boss is mostly attacking with Light and Heavy Attacks. Its Heavy Attacks are devastating and the Tank should hold aggro and block to survive. There are also several adds spawning both down on the ground and up on the platforms.
Occasionally the Keeper will cast a shield around him. When that happens the Tank should stay on the ground, while the other members of the group should go up with the grapple bow, on different platforms. One of the players will see a glowing sigil(sigil of the forgotten). Interact with it to activate the sigil on the boss area.
Flames will start rising in the room, damaging the group. The Tank should bring the Keeper on the active sigil on the ground and the group should deal damage to him. When the shield drops, he will stab his sword and the flames will stop rising. Continue doing this and damaging the Boss until dead.
Eternal Aegis
Arguably the easiest fight in the entire Dungeon! A menacing looking Boss that can spawn adds and deal good damage if you are not careful.
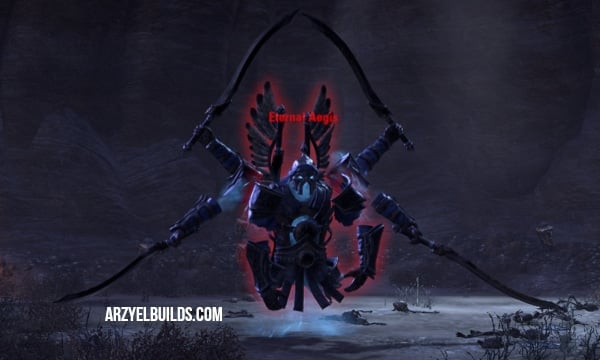
How to Defeat Eternal Aegis in Unhallowed Grave Dungeon
Its Heavy Attack is deadly! The Tank should aggro, turn him away from the group and Block to survive! He can also throw its swords in different directions, dealing damage and summon smaller versions of it. Actually the faster you drop its health, the faster it spawns adds! The adds it spawns do similar attacks but they are easy to defeat with AOE skills! During the fight it will cast a large circular AOE that deals significant damage to anyone caught in it. The easiest way to deal with this attack is to stack on the boss and avoid all damage!
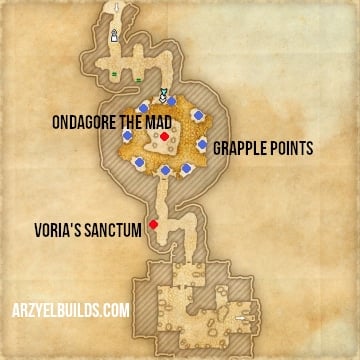
Ondagore the Mad
Overall a simple fight that relies heavily on mechanics! If you fail a mechanic you will die instantly!
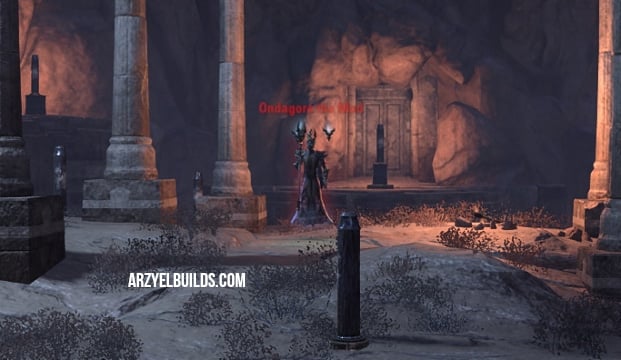
How to Defeat Ondagore the Mad in Unhallowed Grave Dungeon
Ondagore is sitting in the middle of the room! Around there are platforms with grapple points! The platforms are filled with Poison when the fight starts. Ondagore attacks with a weak Light Attack most of the time! He can however spawn ghosts and a Bone Colossus. Focus on the Colossus and kill it fast before it becomes a problem. Ghosts should die fast from your AOE. When his Health drops to 80% and 40% he will pull the poison from the platforms to his area. Now is the time to use your grapple bow and get to the platforms. Move around the platforms and kill every enemy there. Once all enemies are dead the Boss will send poison back and you should go back to his fight him again!
After this phase is over, the Boss will turn white and start charging an Explosion. This explosion will instantly kill you if you are sitting in the open! Hide behind the pillars to survive! During this phase four menders will also appear. They will strengthen the Boss and keep the explosion phase going until they are dead. Kill the menders to end this phase and continue the fight. You can kill all menders but one however! This might keep the explosion phase active but will help you avoid a second jump on the platforms! Deal damage and hide behind the pillars when the explosion is about to happen. Rinse and repeat to defeat the boss!
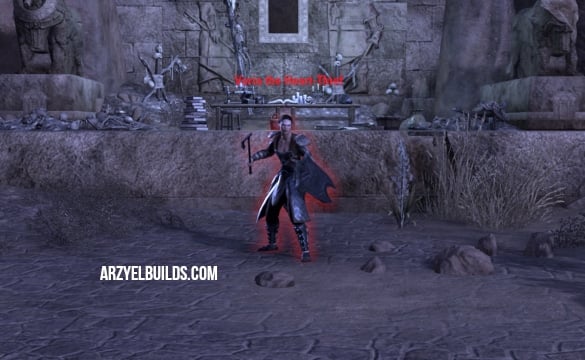
Kjalnar Tombskald
The Final Boss of the Dungeon. He has a few deadly mechanics and is also one of the most impressive fights in here!
How to Defeat Kjalnar Tombskald in Unhallowed Grave Dungeon
His Heavy Attack is deadly and the Tank will have to block it to survive! He can summon a large AOE that launches smaller traps in the area! If you step on them you will take damage. He will also summon a ghost hand to immobilize you. Break free to escape it.
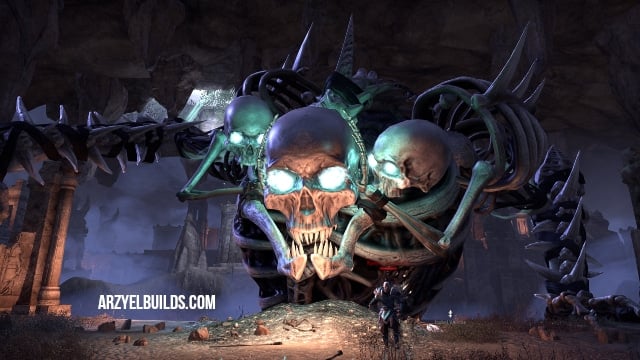
During the fight he will cast a blue flame that will spawn fields on the edge of the room. You should deal with the fields as fast as possible. From the fields enemies will start spawning. These enemies will be blastbones-like skeletons but also bigger ones that hit hard! He can also spawn bone cages that will explode after a moment, dealing significant damage. Try to avoid those. When his health drops to 50% he will summon a giant skeleton to assist him! You cannot damage the skeleton but you will have to avoid its attacks. The Giant skeleton will attack with an ice breath and shoot fireballs that leave a flame AOE on the ground!
Secret Bosses – How to Unlock Voria’s Sanctum
In total there are three secret Bosses in the Unhallowed Grave Dungeon. These are completely optional to defeat but will grant you specific buffs, that will make it easier to complete the Dungeon. You will have to find and defeat the previous secret Boss in order to find the next one! Defeating the first two Secret Bosses will allow you to unlock Voria’s Sanctum!
How to Unlock Voria’s Sanctum in Unhallowed Grave Dungeon
- Find Nabor the Forgotten
Find and defeat Nabor the Forgotten to receive his Forgotten Strength Buff. This will allow you to see hidden Grapple Points!

- Find Voria the Heart-Thief
When you get to an open area after the Keeper of the Kiln Boss fight head to the edge on the East. This will reveal a path of hidden Grapple Points! Follow the path to find and defeat Voria! Receive her Voria’s Authority Buff. This will allow you to dispel seals placed by her!

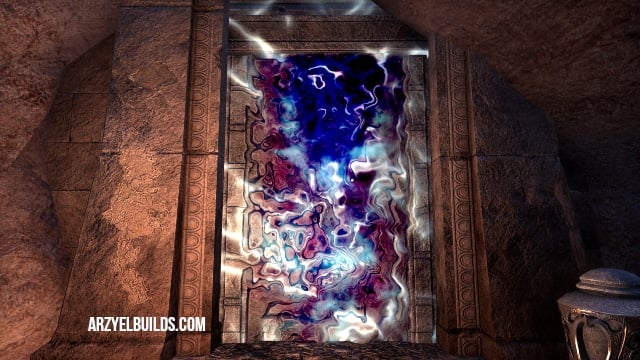
- Dispel the Seal and enter the Sanctum!
Right after Ondagore the Mad Boss, approach the sealed Sanctum. Get closer to dispel the seal and unlock it! Get inside and defeat Voria’s Masterpiece Boss!

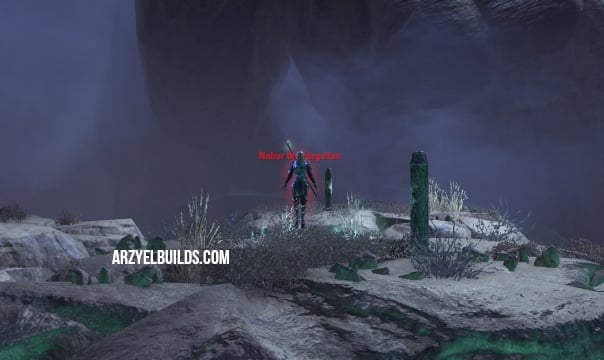
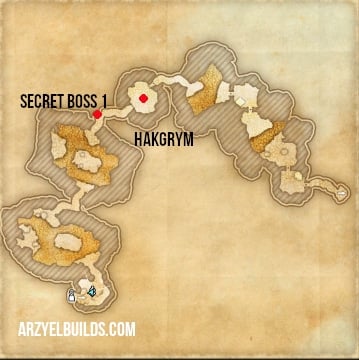
Where to find Nabor the Forgotten in Unhallowed Grave Dungeon
This is the first secret boss of the Unhallowed Grave Dungeon. You can find the entrance to his location right before the first main Boss, Hakgrym the Howler. It is easy to miss the narrow entrance between the stones so pay attention to your surroundings. Keep following the voice inside the new rooms until you reach Nabor in the platforms!

How to Defeat Nabor the Forgotten in Unhallowed Grave Dungeon
This is an easy fight! Nabor is sitting in the middle of the area, on one of the platforms. His light attacks are weak. During the fight he will start charging an explosion on some of the platforms. Simply use your grapple bow and move to another to avoid damage! Return back to him and continue attacking! He will also summon a few adds but they are easy to kill or ignore! His strongest attack is a channeled release of multiple projectiles that you cannot interrupt. Easy to block or out heal though.
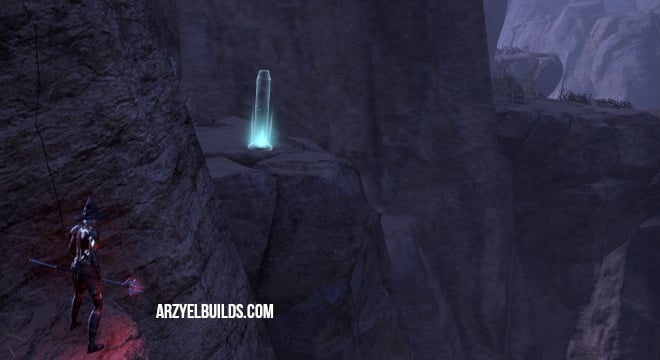
When you kill him, interact with the glowing Unhallowed Urn to receive the Forgotten Strength Buff! The Buff will empower your grapple bow and increase your Weapon and Spell damage! If you are a Necromancer it will provide a bigger boost to Weapon and Spell damage! This buff is also important because it will allow you to see hidden grapple points and reach new locations inside the dungeon!
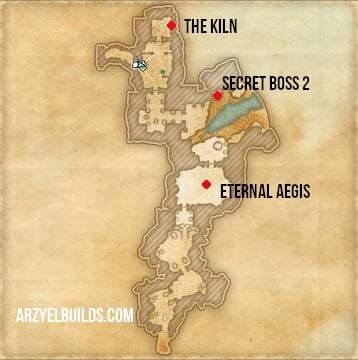
Where to find Voria the Heart-Thief in Unhallowed Grave Dungeon
Now that you can see hidden grapple points it is easy to reach Voria’s location. You can find the second secret boss after the Keeper of the Kiln and before the Eternal Aegis locations! When you reach an open area on the second map of the dungeon (after Keeper of the Kiln) get closer to the edge to reveal a grapple point.
Follow the new path until you reach Voria’s location! Overall she is an easy boss to defeat with one interesting escape mechanic!
How to Defeat Voria the Heart-Thief in Unhallowed Grave Dungeon
She will mostly light attack and use a Necromancer scythe-like attack! Easy to block. Be careful of her Heavy Attack though. At 75% Health however she will try to escape! She will jump on the opposite area and you will have to reach her fast with your grapple bow and interrupt her before she escapes! If she manages to escape you cannot unlock her Sanctum and defeat the third secret Boss. You will have to restart the Dungeon for this!
Once you interrupt her, she will transform into a Goliath! She can now do the previous attacks as well as bash whoever has aggro. At around 30% Health she will try to escape again. Follow her back to her initial location and interrupt her. Now she will also summon smaller AOEs on the ground. Defeat her and interact with the Urn to receive the Voria’s Authority buff! This buff will boost your Magicka and Stamina Recovery and if you are a Necromancer it will provide a bigger boost! It will also allow you to break magical seals placed by Voria! Which means that you can now Unlock Voria’s Sanctum!
Where to find Voria’s Masterpiece in Unhallowed Grave Dungeon
You can now enter Voria’s Sanctum and fight the last Secret Boss, Voria’s Masterpiece! The sealed door is right after Ondagore the Mad Boss on your right! Get closer to the door to dispel the seal!

How to Defeat Voria’s Masterpiece in Unhallowed Grave Dungeon
Its Light Attacks are weak but it can empower its hand with poison and stomp the ground, leaving a large poison AOE! Block this attack and try to avoid the AOE! During the fight it will summon Oozes! These are big blobs that move slowly and attack you! You can move through them with your grapple bow to split them in half and weaken them though! Once you defeat the Boss you will receive the Abominable Bulwark Buff! This will boost your Maximum Health and reduce your damage taken. If you are a Necromancer the boost will be higher!

Arzyel is a passionate Gamer and huge fan of the Elder Scrolls Series! A professional Content Creator and owner of the arzyelbuilds.com website that is focusing on The Elder Scrolls Online with the Best ESO Builds and Guides, as well as Throne and Liberty content with several TL Builds and Guides! Arzyel also publishes videos on his YouTube channel!
Thanks to his experience in Gaming and especially Online Gaming, Arzyel can create practical and effective Builds & Guides for ESO, Throne and Liberty and other titles, that are perfect for both New and Veteran Players! For more info you can check his Linktree and his About Me page.