

Cave of Desperation Dungeon Guide
Best Cave of Desperation Dungeon Guide for Throne and Liberty! This Guide will show you everything you need to know to complete the Dungeon, including the necessary mechanics to defeat all Bosses.
What is Cave of Desperation in Throne and Liberty?
Cave of Desperation is the third Dungeon you will unlock in Throne and Liberty when you reach Level 40! Part of three starter Dungeons along with Specter’s Abyss and Roaring Temple, that aim to teach you how Bosses mechanics work and prepare you for harder content. You can access the Dungeon from the Co-Op Dungeons tab in your options. You can also request a Party Matchmaking from there, that will put you in a group of two(2) players and teleport you to the Dungeon. To enter the Dungeon you must be Level 40 but also have a minimum Combat Power of 1200!

How to Improve Combat Power in Throne and Liberty?
Combat Power is an indication of how strong your character is in Throne and Liberty! In order to enter various Dungeons, you will need to reach a specific level of Combat Power. To enter the Cave of Desperation Dungeon you need to reach 1200 Combat Power.
To check your Combat Power, press “P” to open your character’s info. You can check your Combat Power right below your Stats! The easiest way to improve your Combat Power in Throne and Liberty is by improving your gear. You can upgrade your armor to boost your Combat power or you can replace it with better quality gear!
Cave of Desperation Bosses
There are three Bosses inside the Cave of Desperation Dungeon that you need to defeat in order to complete it! One Main Boss and two mini-Bosses. These are:
- Lacune
- Mutant Princess Ant
- Mutant Giant Acid Ant

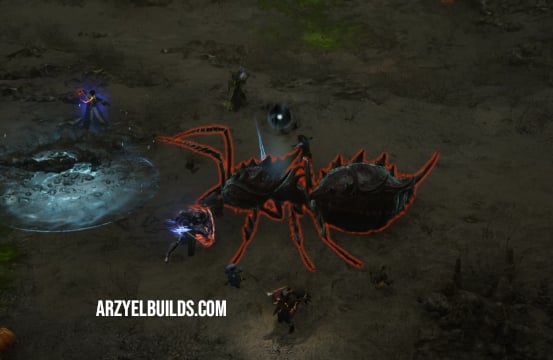
Mutant Princess Ant Boss
Before you can fight this Boss, you will have to clear every enemy inside the two first rooms! In the first room of the Dungeon you have to fight Mutant Ants. They are relatively easy to deal with but be careful of Explosive Ants. This enemy charges you, explodes and inflicts you with Poison. Once you clear all waves of enemies the road ahead will open and you can proceed to the first Boss room.

There are Ant Larva spawning in waves in the room. Defeat them fast before they evolve into Ants and start attacking you. Once you deal with all waves the Mutant Princess Ant will spawn. An overall easy Boss that you should have no issue defeating fast. Her main attacks are:
- Normal Bite attack to the player with aggro.
- Can summon Ant Larva that you need to kill before they evolve.
- Can throw Ant Larva on the head of two players that will explode after a while dealing damage. The two players with the Larva will need to get closer to each other so they can swap the larva on their heads and avoid damage.
- A Poison Conal attack in front of her, towards the player with aggro.
Mutant Giant Acid Ant Boss
When you defeat the first Boss proceed to the next room. There you will find an Empty Poison Sac. Destroy it and three Poison Sacs will appear. Destroy those as well. Waves of Ants will start spawning. After a few waves a Giant Acid Ant Egg will spawn in the middle of the room with three Poisonous Worker Ants linked to it. Defeat the worker Ants so you can damage the Egg. Destroy the Egg and the Mutant Giant Acid Ant will appear! This is another easy Boss fight with a few only mechanics:
- The Boss does a bite attack to the player with aggro.
- It summons poison pools around the area. Stay out of the pools to avoid damage.
- The Boss summons a large poison pool at its location and after a while it pulls all players there. You can block this pull mechanic.
When you defeat the Boss the road ahead will open and you can get in the big room of the Cave, where you can find the final Boss, Lacune!
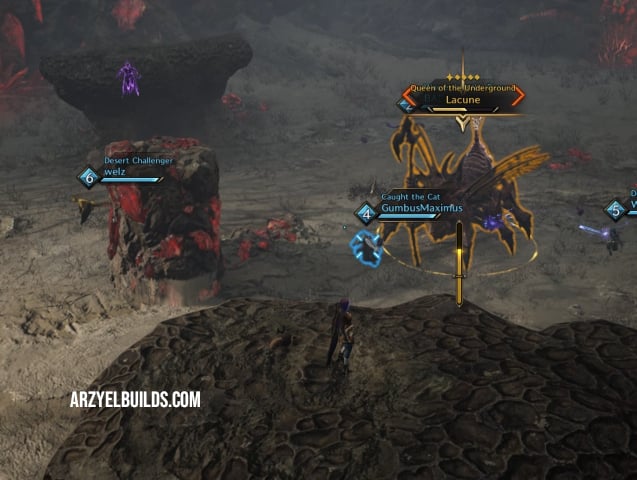
Lacune Final Boss in Cave of Desperation Dungeon
This last room is a large open area with three platforms around, that are important to survive Lacune’s one-shot mechanic! These are the main mechanics of this Final Boss in Cave of Desperation:
- Lacune performs normal Weapon attacks to the player with aggro.
- Occasionally performs charged attacks again towards the player with aggro. Since this is logically your Tank, you should avoid staying next to them or behind them.
- Lacune summons paralyzing ants that attack players and can paralyze them with their Fury Attacks. Kill them fast or a ranged DPS can kite them while avoiding their Fury Attacks.
- Lacune will speak and summon a red circle. After a few moments a pillar will rise from that spot. All players should head fast to the circle and wait for the Pillar to lift them. When the pillar is up Lacune will perform an area wide AOE that will one shot anyone on the ground. Another way to avoid this AOE is to head over to one of the three platforms in the area instead of the pillar. Get on one of the platforms but do not go on top immediately. Wait for the Egg on the top of the platform to explode first. If you go to the platform while the egg is still there, it will explode and push you back down to the ground.
- After the AOE mechanic, a Gem Ant will appear on one of the three platforms. If it stays alive for a while it will enrage Lacune, so focus on killing it as fast as possible.
- Lacune will throw Larva on every player! These will explode after some time and deal massive damage. Players in pairs should approach each other so they can swap their larva and mitigate their damage. Someone will have to swap larva with the tank, so they will not take damage and lose aggro.
Lacune is the most challenging Boss in the three starter Dungeons and prepares you for the Cave of Destruction Level 50 Dungeon Final Boss fight! For the Best Builds you can use to clear this Dungeon and prepare for the rest, you can take a look at my Throne and Liberty Builds!

Arzyel is a passionate Gamer and huge fan of the Elder Scrolls Series! A professional Content Creator and owner of the arzyelbuilds.com website that is focusing on The Elder Scrolls Online with the Best ESO Builds and Guides, as well as Throne and Liberty content with several TL Builds and Guides! Arzyel also publishes videos on his YouTube channel!
Thanks to his experience in Gaming and especially Online Gaming, Arzyel can create practical and effective Builds & Guides for ESO, Throne and Liberty and other titles, that are perfect for both New and Veteran Players! For more info you can check his Linktree and his About Me page.